The Step-by-Step Guide for a Roof Drip Edge Repair or Replacement
August 15, 2024
Table of Contents
What is a roof drip edge?
A roof drip edge is a metal strip located at the edge of a roof. Its main job is to guide water away from the roof and into the gutters. This helps prevent water from soaking into the fascia, roof deck, and soffit. If a home needs a new roof, the drip edge should also be replaced to maintain proper protection.
Importance of a Roof’s Drip Edge
The roof drip edge plays several important roles:
Water Management: It directs rainwater away from the roof and into gutters, stopping pools of water from forming.
Fascia Protection: By moving water away from the fascia board, it helps evade moisture problems such as rot or damage.
Soffit and Deck Defense: A well-placed drip edge shields the soffit and roof deck from water damage and mold.
Aesthetic Value: It offers a neat finish to the roofline, improving the home’s outside appearance.
Increased Lifespan: Preventing water-related damage helps the roof system last longer and reduces repair needs.
Gutter Efficiency: A sound drip edge ensures water flows properly into gutters, keeping them functioning well.
Ice Dam Prevention: In colder weather, it helps prevent ice dams from forming by keeping water flowing away from the roof edge.
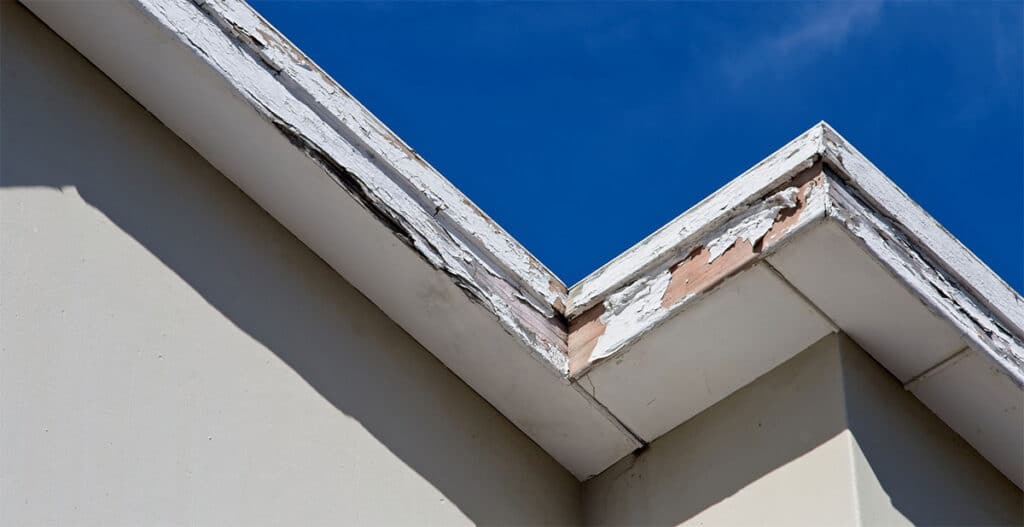
Signs of Roof Drip Edge Damage
Homeowners should be aware of signs indicating a drip edge may be failing:
Water Stains: Dark spots on the fascia or walls could result from water getting behind the drip edge.
Peeling Paint: Flaking or bubbling paint near the roof line may suggest moisture is entering from a faulty drip edge.
Rotting Fascia Board: Damage to the fascia close to the roof edge might indicate too much moisture exposure due to a bad drip edge.
Mold or Mildew: Discovering mold growth around the roof edge suggests that excess moisture is being allowed inside.
Water Dripping Behind Gutters: If water drips behind gutters, there could be an alignment issue between the gutter and the drip edge.
Damaged Shingles: Shingles that curl or crack near the edge of the roof might be suffering from water infiltration.
Ice Dams: Ice accumulation on the roof suggests problems with the drip edge that leads to water build-up and freezing.
Installation or Replacement of a Roof Drip Edge
When it comes to adding or replacing a drip edge, here’s the process typically followed:
Assessment: The first step is to examine the current drip edge to identify any rust, corrosion, or detachment.
Preparation: Before starting, the work area is set up to ensure safety and accessibility.
Removal: The old drip edge is taken off carefully to minimize damage to the underlying materials.
Clean-up: After removal, the area is cleaned to eliminate debris and prepare for the new installation.
Measurement: Accurate measurements are taken along the roof edge to determine how much new drip edge is needed.
Cutting (if required): The new material may need to be cut to the right length for a good fit.
Installation: The new drip edge is fastened securely to the roof line to ensure it stays in place.
Sealing: A high-quality sealant is applied along the top of the drip edge to protect against leaks.
Finishing: After installation, the work is inspected to ensure everything is done correctly and looks good.
Inspection: A final review ensures the installation meets quality standards for effectiveness.
Maintenance: Guidance is provided on how to care for the drip edge to keep it functioning well over time.
This process ensures that the drip edge serves its purpose effectively while enhancing the longevity of the roof system.
Frequently Asked Questions
How is drip edge flashing installed on a new roof?
To install drip edge flashing on a new roof, start by placing the flashing along the eaves. It should be positioned so that it hangs over the edge of the roof. Secure it with roofing nails every 12 inches and ensure it is under the shingles for proper water flow.
What are the steps to replace drip edge on an existing roof?
Replacing drip edge on an existing roof involves a few steps. First, remove the old drip edge by prying it off with a flat bar. Next, clean the area where it was attached. Then, fit the new drip edge in place, ensuring it overlaps the shingles and secures it with nails.
What is the proper way to overlap drip edges to ensure water runoff?
To ensure water runoff, the drip edges should overlap by at least 1 inch. Place the top edge of the new piece under the previous one. This setup helps direct the water away from the roof and into the gutters.
What is the difference between rake edge and drip edge in roofing?
The rake edge runs along the sloped sides of the roof, while the drip edge is at the lower edge, where the roof meets the gutters. Both serve to protect the roof, but they are used in different locations and for slightly different purposes.
Is it possible to replace only the drip edge without installing a new roof?
Yes, it is possible to replace only the drip edge without needing a whole new roof. This repair can be done when the existing roof is still in good condition, ensuring continued protection from water damage.
How much does it typically cost to replace drip edge flashing?
The cost to replace drip edge flashing generally ranges from $1 to $2 per linear foot. Labor costs may add an additional amount, depending on the roofing contractor and the complexity of the job.
Share this article with a friend
Create an account to access this functionality.
Discover the advantages
Installing drip edge flashing on a flat roof involves measuring and cutting the flashing to fit the roof's edge, securing it with roofing nails, and sealing the joints with a compatible sealant to prevent water leaks.
Can I install drip edge after shingles?
Yes, you can install a drip edge after shingles. Drip edges are typically installed before the shingles, but they can be added later to help direct water away from the roof's edge and prevent water damage.
What are drip edges on a roof?
Drip edges on a roof are metal or plastic components installed along the roof's edge to direct water away from the building, preventing damage to the fascia, siding, and foundation.
What happens if you don’t put a drip edge on a roof?
If you don't install a drip edge on a roof, water can seep behind the gutters and cause damage to the roof's fascia and the home's exterior, leading to potential leaks and structural issues.
What is a roof drip edge?
A roof drip edge is a metal flashing installed along the edges of a roof to direct water away from the roof and prevent it from seeping into the roof's structure and causing damage to the building materials.
How to install roof drip edge?
Installing a roof drip edge involves properly positioning it along the roof's edge, securing it with nails or screws, and ensuring a tight seal to effectively direct water away from the roof and prevent damage to the building materials.
Is a drip edge necessary on a roof?
A drip edge is a necessary component of a roof as it helps direct water away from the roof's edge, preventing water damage to the building's exterior and foundation.
What tools are needed for drip edge installation?
The main tools needed for drip edge installation include a utility knife, metal snips, a hammer, a pry bar, and a sealant or adhesive. These tools are necessary to measure, cut, and securely install the drip edge along the roof's edge.
Can drip edge prevent roof leaks?
Roof drip edges can help prevent roof leaks by directing water away from the roof and preventing it from seeping under the shingles and into the home's interior. Properly installed and maintained drip edges are crucial for protecting a roof's integrity and preventing water damage.
What materials are best for drip edges?
The best materials for drip edges are typically aluminum, galvanized steel, or vinyl, as they are durable, weather-resistant, and effective in diverting water away from the roof and protecting the fascia board.
How to measure for drip edge accurately?
Accurately measuring for a roof drip edge involves carefully taking measurements along the roof's edge, ensuring the drip edge extends beyond the fascia board by the recommended distance to effectively channel water away from the roof.
What is the ideal drip edge length?
The ideal drip edge length is typically 2 to 4 inches beyond the fascia or roof edge to effectively direct water away from the building's exterior.
Can I use aluminum for drip edges?
Yes, aluminum is a common and suitable material for roof drip edges. Aluminum drip edges are durable, corrosion-resistant, and provide effective water diversion to protect the roof and surrounding areas from water damage.
How does drip edge protect roof fascia?
The drip edge protects the roof fascia by directing water runoff away from the roof's edge and the fascia board, preventing water damage and rot to the fascia.
Which drip edge style suits my roof?
The choice of drip edge style depends on the roofing material and slope of your roof. Consult with a roofing professional to determine the most suitable drip edge style for your specific roof.
Is there a standard drip edge height?
The standard drip edge height typically ranges from 1.5 to 2 inches, as this dimension helps effectively direct water away from the roof's edge and protect the underlying building materials.
How to remove old drip edges safely?
Removing old drip edges safely involves carefully prying them off to avoid damaging the roof or causing injury. Wear protective gear, use the right tools, and dispose of the old drip edges properly to ensure a safe and effective replacement.
What is the cost of drip edge installation?
The cost of drip edge installation varies depending on factors such as the size of the roof, the complexity of the job, and the location. On average, homeowners can expect to pay between $300 to $500 for a standard drip edge installation.
How to maintain a drip edge system?
Maintaining a drip edge system involves regularly inspecting it for damage, clearing debris, and ensuring proper installation and sealing to prevent water intrusion and protect the roof and building structure.
What are the common drip edge problems?
Common drip edge problems include improper installation, rust, and deterioration over time, which can lead to water damage, leaks, and other roofing issues if not addressed promptly.
Can drip edge installation be DIY?
Drip edge installation can be a DIY project, but it requires careful planning, proper tools, and attention to detail to ensure effective water drainage and prevent roof damage.
How does climate affect drip edge choice?
The climate significantly impacts the choice of drip edge, as the material and design must be suitable for the local weather conditions to effectively protect the roof from water damage.
What design considerations for modern drip edges?
The design considerations for modern drip edges include ensuring proper water drainage, material durability, corrosion resistance, and aesthetic integration with the roof's overall design to protect the building's exterior and enhance its appearance.
Are there drip edge options for flat roofs?
Yes, there are drip edge options for flat roofs. Flat roofs can be equipped with specialized drip edge systems designed to effectively channel water away from the roof's edge, preventing water damage to the building's exterior.
How do drip edges enhance roof aesthetics?
Drip edges enhance roof aesthetics by providing a clean, finished look to the roofline, creating a visually appealing and well-maintained appearance for the home. They help conceal the edge of the roof and integrate it seamlessly with the exterior of the building.
What are local codes for drip edge installation?
Local building codes for drip edge installation typically require proper positioning, secure attachment, and material specifications to ensure effective water drainage and roof protection.
How often should drip edges be inspected?
Roof drip edges should be inspected at least once a year, typically during the spring or fall, to ensure they are functioning properly and not damaged. Regular inspections help identify any issues before they lead to more extensive roof or water damage.
Can I install drip edges in winter?
Yes, you can install drip edges in winter, but it may be more challenging due to colder temperatures and potential precipitation. Proper preparation and installation techniques are crucial to ensure a successful and effective drip edge installation during the winter months.
Whats the lifespan of a drip edge?
The lifespan of a drip edge can vary, typically ranging from 20 to 30 years, depending on factors such as climate, installation quality, and maintenance.
What is the best time for drip edge repairs?
The best time for drip edge repairs is typically during the warmer months, as this allows for easier installation and ensures that the sealants and fasteners can properly adhere to the roof surface.
replacing drip edge, how to install drip edge on a metal roof, guide to drip edges, how to overlap drip edge, how to install drip edge on roof, roof edge repair, drip edge on roof, installing drip edge on existing roof, installing roof drip edge, how much should drip edge overlap, how to install drip edge, how to install drip edge flashing on roof, roof drip edge installation, how to install a drip edge on a roof, how to install metal roof drip edge, how to remove drip edge, how to install drip edge for metal roofing, how to install a drip edge, drip edge repair, metal roof drip edge installation, overlapping drip edge, flat roof drip edge installation, drip edge on metal roof, installing drip edge on existing roof with gutters, add drip edge to existing roof, how to install drip edge with gutters, can you install drip edge after gutters, installing drip edge on roof, drip edge installation cost, proper way to install drip edge, drip edge replacement, install drip edge on roof, metal drip edge installation, installing drip edge on a roof, drip edge overlap, install drip edge, install drip edge on existing roof, how to install drip edge on a roof, cost to install drip edge on existing roof, cost to install drip edge, drip edge on a roof, how to cut drip edge, drip edge flashing installation, drip edge cost, how to install a roof drip edge, drip edge roof installation, drip edge roofs, drip edge or ice and water first, installing drip edge on metal roof, how to put drip edge on roof, installing a drip edge, do you have to replace drip edge when replacing roof, drip edge installation on existing roof, how to install metal roof edging, how do you install drip edge, shingle drip edge, labor cost to install drip edge, roofline repair, how to install metal roofing drip edge, install drip edge after shingles, how to splice drip edge, what is the drip edge on a roof, best way to cut drip edge, how to install roofing drip edge, cutting board with drip edge, roof drip edges, how to install drip edge on metal roof, install drip edge flashing, do you overlap drip edge, installing roofing drip edge, fascia board drip edge, the preferred method for installing drip-edge flashing is, drip edge concrete, nailing drip edge, installing drip edge for metal roof, how to install drip edge on existing roof, how to replace fascia board with drip edge, how to finish metal roof edge, do you have to remove gutters to install drip edge, roof drip edge flashing installation, how to install drip edge after shingles, installing fascia and drip edge, build up edge, how to replace drip edge, fascia drip edge, nails for drip edge, drip edge roofing, how much does drip edge cost, overlap drip edge, how to install roof drip edge, what is the purpose of a roof drip edge, roofing drip edge, how to put drip edge on a roof, what is drip edge on a roof, roof drip edging, drip edge roof, drip edge installation, roof edge flashing, can you replace drip edge without removing shingles, how do you install drip edge on existing roof, drip edge installation charleston county south carolina, roofer edges, flat roof drip edge, drip edge flashing
Understanding the Crucial Role of Roof Drip Edge
The roof drip edge is a vital component of any roofing system, designed to protect your home from water damage. It's a piece of metal flashing installed along the edges of the roof deck, specifically at the eaves and rake edges. Its primary function is to direct water away from the roof and into the gutters, preventing it from seeping under shingles and into the underlying roof structure, such as the fascia and soffit.
By effectively managing water runoff, the drip edge plays a significant role in extending the lifespan of your roof and preventing costly repairs. It acts as a barrier against moisture, safeguarding the vulnerable areas of your roofline from rot, decay, and structural compromise. Proper installation and maintenance of the drip edge are therefore essential for the overall health and integrity of your home's exterior.
Types of Roof Drip Edge
Roof drip edges come in various styles, each designed to suit different roofing materials and installation scenarios. The most common types include the "T-style" or "F-style" drip edge, which features a lip that extends down the fascia board, and the "G-style" drip edge, which has a more integrated design often used with certain shingle types. Understanding these variations is crucial for selecting the appropriate drip edge for your specific roofing needs.
The choice of drip edge can impact its effectiveness in directing water and its aesthetic integration with the roofline. For instance, T-style drip edges are highly effective at preventing water from running down the fascia, while G-style might offer a cleaner look. Factors such as local climate, roof pitch, and the type of shingles used will influence the best drip edge selection for optimal performance and protection.
Benefits of Professional Drip Edge Installation
While some DIY enthusiasts might consider installing or replacing a drip edge themselves, the benefits of hiring a professional roofing contractor are substantial. Professionals possess the expertise, specialized tools, and knowledge of building codes to ensure the drip edge is installed correctly and effectively. This not only guarantees optimal water management but also prevents potential damage that could arise from improper installation.
A professional installation ensures that the drip edge is properly integrated with the roofing materials, flashing, and gutters. This comprehensive approach minimizes the risk of leaks, water intrusion, and premature deterioration of roof components. Furthermore, professional services often come with warranties, providing peace of mind and protecting your investment in your home's roofing system.
When to Consider Drip Edge Replacement
The lifespan of a roof drip edge can vary depending on the material quality, environmental conditions, and installation. However, certain signs indicate that it's time to consider replacing your drip edge to prevent further damage. Obvious signs of corrosion, rust, or physical damage such as bending or detachment are clear indicators that the drip edge is no longer providing adequate protection.
Beyond visible damage, persistent issues like water stains on the fascia or soffit, or water appearing behind gutters, can also signal a failing drip edge. If you are undertaking a roof replacement, it is highly recommended to replace the drip edge simultaneously, as it's a cost-effective way to ensure the entire roofing system is up to par and protected against future water-related problems.